Analytix Installation/Upgrade Guide
Introduction
Before you can use Analytix, you will need to install a few things. This document covers the installation of the Analytix files themselves.
To install Analytix, you must first run the AnalytixInstaller_Setup.exe application. This will install an application called analytix-installer. The analytix-installer application is run the actually install or upgrade Analytix.
Once the analytix-installer has been installed, it may be run multiple times. For example, if you are going to create a Production and a Testing Analytix environment, you would want to run the analytix-installer twice. Once for the Production environment and once fro the Testing environment.
Installing Analytix
Only install Analytix to a directory that you
Step 1: Choose Install Option
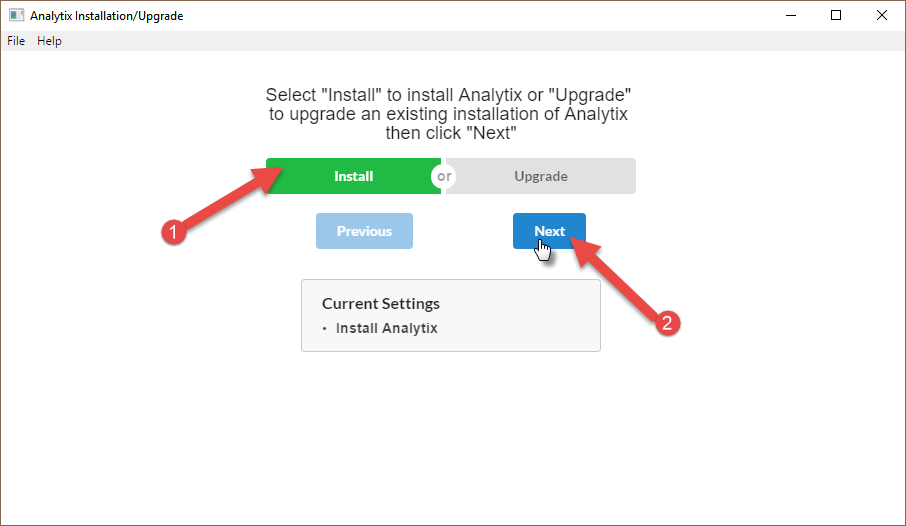
To install Analytix, you will run the Analytix Installation program. Upon running, on the first screen, you will select the "Install" options and then click on "Next":
Step 2: Choose Installation Directory
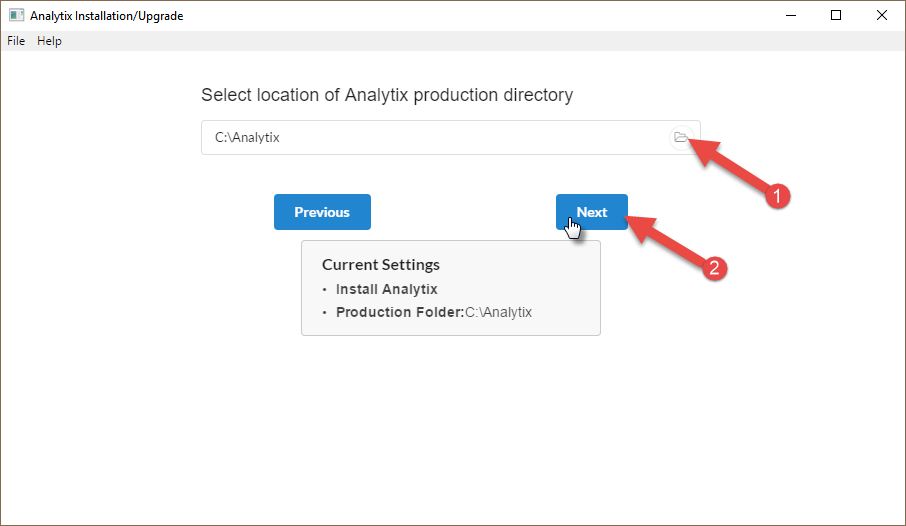
On the next page, you will be asked to select the location to install Analytix into. Select, the root directory to install into and the application will add the "Analytix" directory for you. Most sites simply install into the C drive. If you click on the File select and choose "C:", the installer will fill in the "Analytix" for you.
Click "Next".
Step 3: Install Analytix (Copy Files)
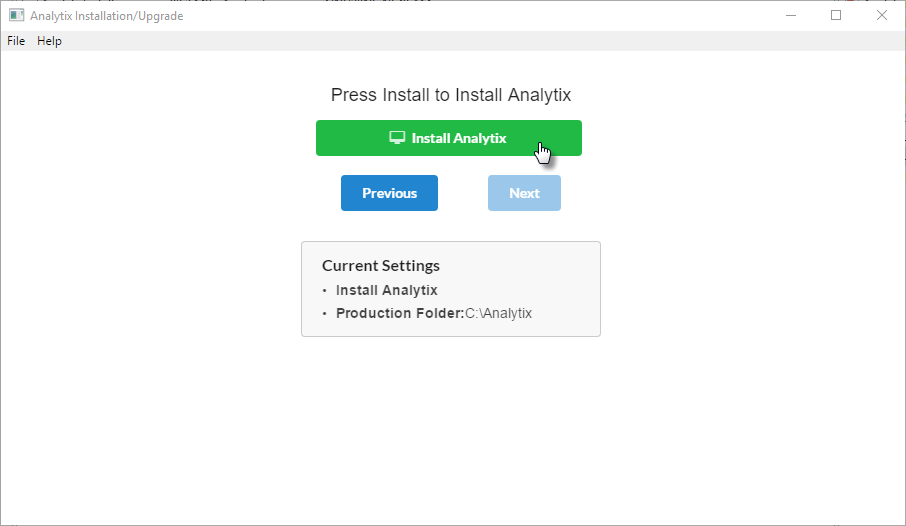
The last step is to simply click on the "Install Analytix" button on the last screen. This will copy the appropriate files over to the directory you choose in step 2.
.
Once Analytix is installed, you will be presented with an "Exit" button. At this point, you may exit the installer application.
What the Installation Did
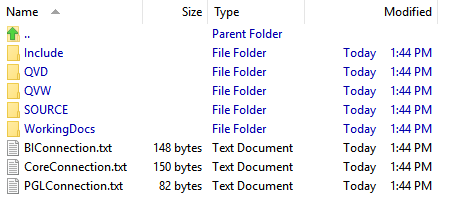
When the installation of Analytix is finished, you will find, in the directory you chose to install Analytix to, a structure that looks as follows:
.
Once the installation is finished, proceed to the Analytix Setup documentation to continue the setup needed to get Analytix running.
Upgrading Analytix
Before beginning, make sure you have the following:
The Analytix Installer setup application.
Remote access to the server where Analytix is installed
Takes a screenshot of the Load Switches found in each of the SOURCE_....qvw files.
You will use these in Step 4(Updating Load Switches), when setting up the new Analytix Source files.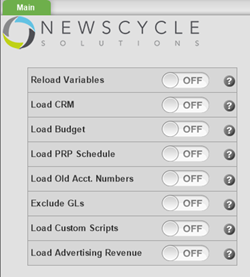
If some of the switches ON/OFF button can't be seen. Click on the Reload variables ON/OFF area. This will usually show the other switches.
When choosing to upgrade, you will be asked to enter the location of your production Analytix. This will be the directory that will be upgraded. Based on the chosen Analytix upgrade location, the application will choose a backup directory. You may change this directory to a different location if you like.
The upgrade application will perform the following steps:
- Backup Analytix to the backup directory chosen.
- Copy the upgrade files to your Analytix directory.
- Merge the existing qvVariables.json and qvGroups.json files with their Upgrade counterparts.
Next, there is a manual step that will require opening the site's QVW files and transferring any custom built tabs/sheets over to the new Analytix QVW files.
The last step is to test all of the changes with a full reload and then user testing. Once everything checks out, the cleanup script can be run.
The rest of this document will walk through each of these steps in details.
Step 1: Choose Upgrade Option
Start the analytix-installer application. If it has not been installed, then install it first.
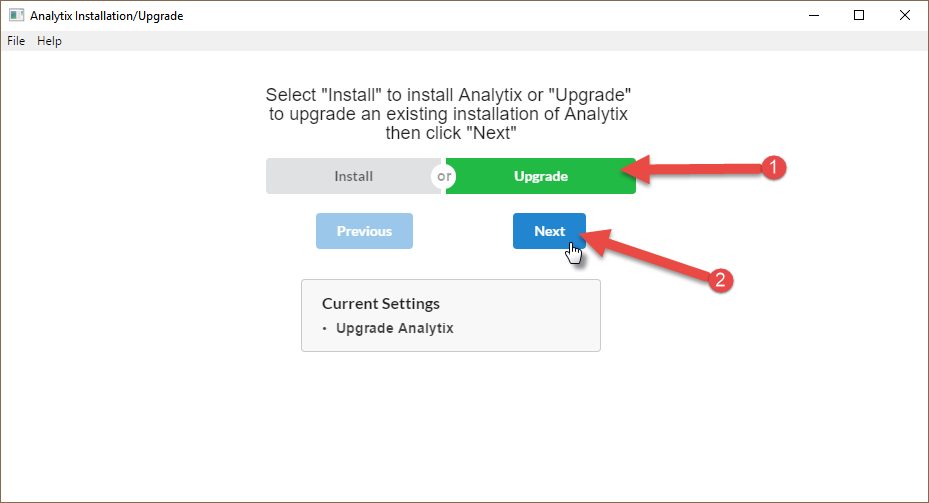
Select "Upgrade" and click "Next".
| Step 1 - Choose Upgrade Option |
|---|
 |
Step 2: Choose Directory to Upgrade
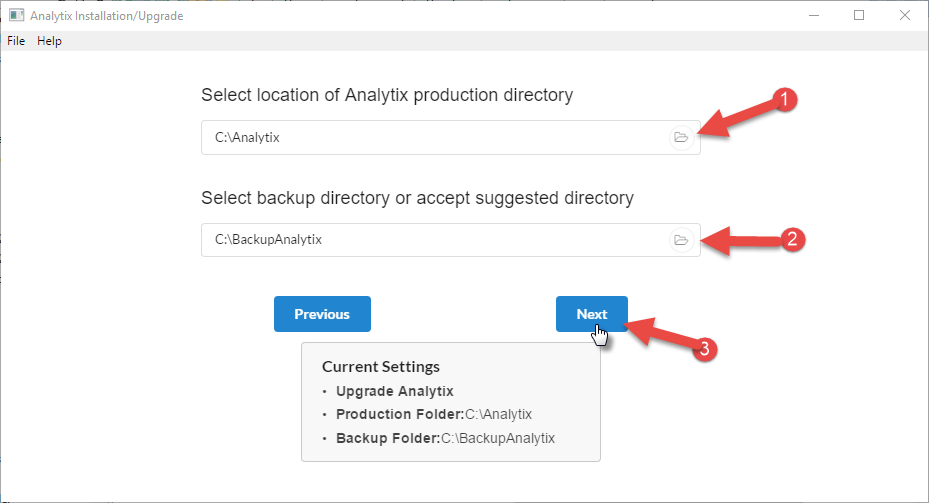
Select the directory where the Analytix file to upgrade are located. Once selected, the Installer application will suggest a backup directory. If this location is OK, simply click "Next". If you would like to change the backup directory, click on the folder icon and choose a new backup location and the click "Next".
| Step 2 - Choose Directory to Upgrade and Backup Directory |
|---|
 |
Step 3: Perform Upgrade
This is the step where the upgrade starts happening. Note that there are three steps that happen:
- The Analytix directory chosen to be upgraded is backed up to the backup directory chosen.
- The Analytix upgrade files are copied to the Analytix directory chosen to be upgraded.
- Merge the existing qvVariables.json and qvGroups.json files with their Upgraded counterparts.
| Step 3.1 - Backup Production Directory (Click "Next" after Green Checkmark appears) |
|---|
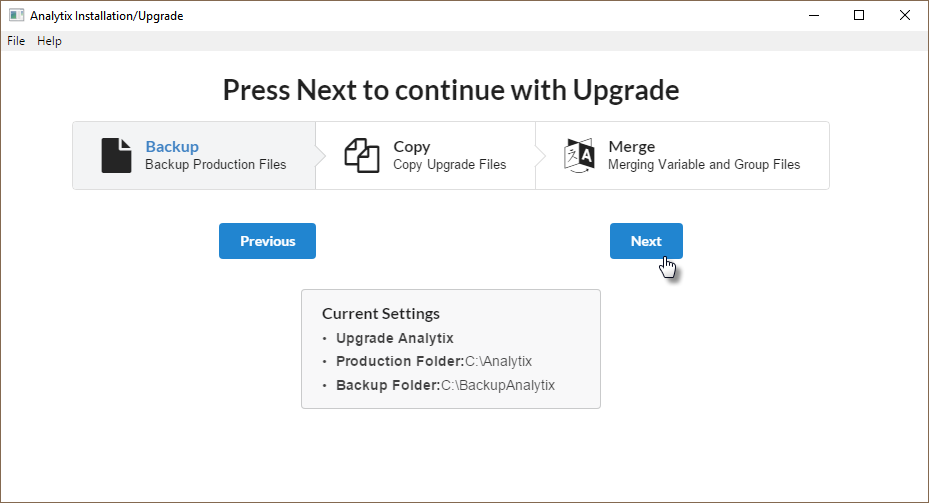 |
Backup Details: This is a straightforward copy of all the files in your production directory. The only files not copied are the *.qvd files in the \QVD directory.
| Step 3.2 - Copy The Upgrade Files (Click "Next" after Green Checkmark appears) |
|---|
 |
Copy Details: The copy step copies the following files to the chosen Upgrade directory, overwriting the existing files except where noted below.
- .\SOURCE -> *.QVW
- .\QVD -> *.QVW
- .\QVW -> copy the QVW over, but prefix them with UPG_
- .\Include\*.qvs
- .\Include\Image\.
- .\Include\SystemQVW\*.*
- .\Include\VariableEditor\
- Before copying the new qvVariables.json file, the existing qvVariables.json file in the Upgrade directory will be renamed to SITE_qvVariables.json.
- .\Include\GroupEditor\
- Before copying the new qvGroups.json file, the existing qvGroups.json file in the Upgrade directory will be renamed to SITE_qvGroups.json.
| Step 3.3 - Merge the Variable and Group Files |
|---|
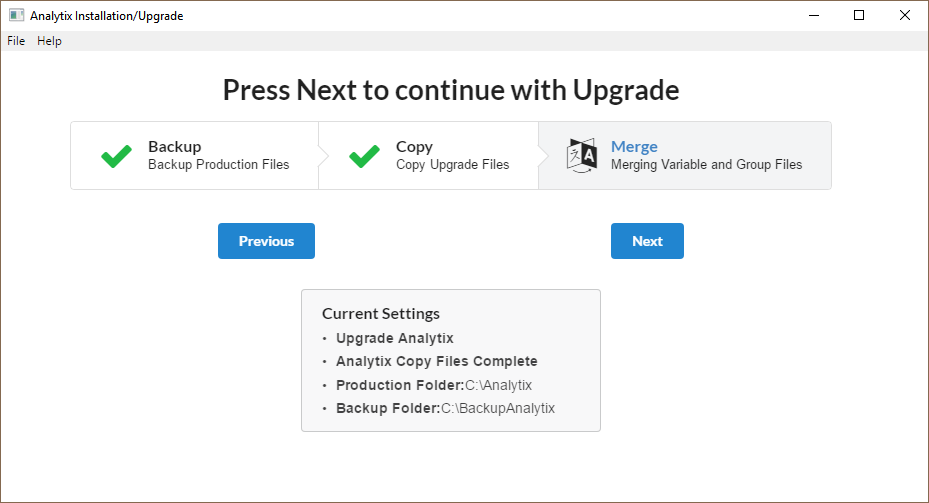 |
Merge Details: The qvVariables.json and qvGroups.json files contain information used in your Analytix files. These files can also be modified by the site administrator using the Variable Editor and/or Group Editor programs.
If you edit these files, we do not want to overwrite anything you have changed with items from the upgrade files.
This step will compare each of these files with their counterpart in the upgrade and make sure to not overwrite anything that you have changed.
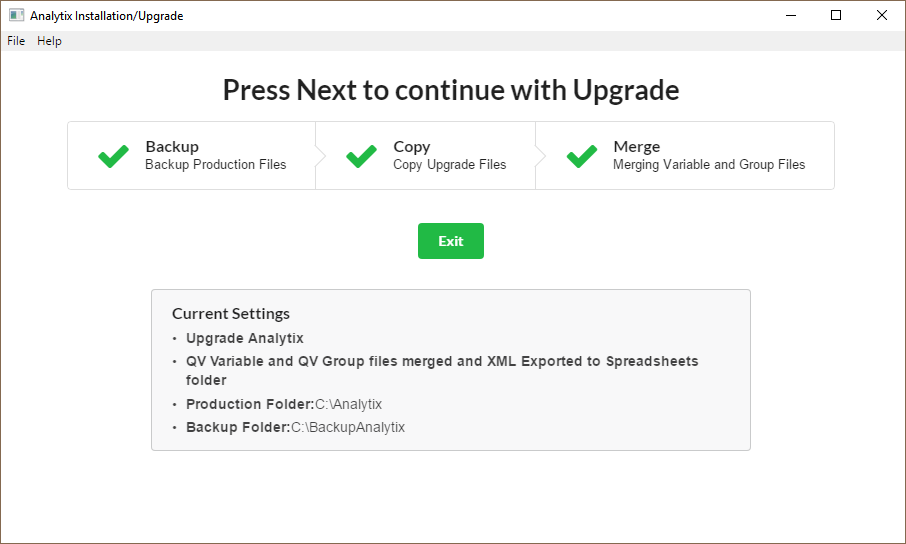
Once done, it will export the a new copy of the needed XML files to the ..\include\ directory.
| Step 3.4 - Click "Exit" |
|---|
 |
Step 4 - Manually Transfer Custom Tabs
Each site using Analytix has the ability to create custom report and chart objects in Analytix. Even though sites do this, there still must be a way to upgrade them to the latest version. This is done by having the site keep all their custom reporting objects on separate tabs/sheets within the Analytix QVW files located in the QVW directory.
This makes it easy to merge their custom work with the new Analytix QVWs.
To perform this step, you will need to be on the Analytix server and using the Qlikview Developer software.
You will perform the following steps on each of the Analytix files in the QVW directory in the Analytix directory you chose to upgrade (probably Analytix\QVW). Note, that some may not have any custom tabs. If this is the case, then you do not need to do anything with that file and its associated UPG_ file.
SalesFlash.qvw will be used in this example.
- Open SalesFlash.qvw in Qlikview Developer (This is the sites QVW file)
- Open a new instance of Qlikview Developer and open the UPG_SalesFlash.qvw
- I like to put these two files side by side on a single screen. You can use the WinKey + Left arrow for SalesFlash.qvw and then WinKey + Right arrow for the Qlikview Developer with the UPG_SalesFlash.qvw open. It will look like this:

- NOTE: You will be moving tabs FROM SalesFlash.qvw TO UPG_SalesFlash.qvw
- For the actual moving of tabs, you will need to know which tabs are the site's custom tabs. It is best to let the site tell you which tabs are theirs. Also note that sites can choose to hide any of the default tabs that are in each Analytix application.
- NOTE: The "Budget" and "CRM" tabs are shown/hidden by setting a Varaible. See main tab in SOURCE_SalesFlash.qvw. The following variables can also be modified in the Variable Editor: -vLoadBudget, -vLoadCRM
- Now the site's tabs will be copied from SalesFlash.qvw to UPG_SalesFlash.qvw. To do this:
- Make one of the site's tabs active.
- Press Ctrl/Shift/S. This will show all objects, even those that are hidden.
- Press Ctrl/a. This will select all of the objects.
- Press Ctrl/c. This will copy all of the objects to your clipboard.
- Make the UPG_SalesFlash.qvw active.
- From the Menu click "Layout/Add sheet...". This will add a new sheet to the UPG_SalesFlash.qvw file.
- Press Ctrl/v. This will paste all of the previously selected objects.
- From the Menu click "Settings/Sheet Properties...". This will display the sheet properties dialog. In this dialog rename the tab to match what is was in the old version and update any colors or other customization the site had done to the tab/sheet.
- Move the tab to the proper position in the list of tabs. This can be done by right clicking on the tab and choosing "Promote sheet" or "Demote Sheet".
Do this for the other QVW files that the site has made modifications to. More than likely it will just be the following:
- SalesFlash.qvw -> UPG_SalesFlash.qvw
- AdvertisingAnalytix.qvw -> UPG_AdvertisingAnalytix.qvw
- Contracts.qvw -> UPG_Contracts.qvw
- ARAnaltyix.qvw -> UPG_ARAnaltyix.qvw
Step 5 - Rename the Upgrade Files
Now, the UPG_... files will need to be renamed and have the UPG_ prefix stripped from them. You will also remove the old QVW files. However, if you need to get access to these files, they will be in the Analytix backup directory you specified in Step 2.
Run the following commands or manually make the changes in Windows File Explorer:
> del AdvertisingAnalytix.qvw
> del ARAnalytix.qvw
> del SalesFlash.qvw
> del Contracts.qvw
> rename UPG_AdvertisingAnalytix.qvw AdvertisingAnalytix.qvw
> rename UPG_ARAnalytix.qvw ARAnalytix.qvw
> rename UPG_SalesFlash.qvw SalesFlash.qvw
> rename UPG_Contracts.qvw Contracts.qvw
Step 6: Reload Source_... and Update Load Switches
Each of the SOURCE files has a set of load switches. When doing an upgrade, these will all be reset. This step will get those set back to what the site had before the upgrade.
To do this properly, we first need to reload the SOURCE file variables. To do this:
- Open SOURCE\SOURCE_SalesFlash.qvw in Qlikview Developer.
- Turn On the "Reload Variables" option.
- If the site is large and a reload would take a long time, I would suggest doing a limited load by using the Debug load option.
- Once the reload is finished, the other Load Switches must be set. Simply refer back to the screenshots or notes that you made before the upgrade (or go into the Analytix backup directory if needed) and set the switches as they were set.
- Save the file.
- Repeat the above 5 steps for each of the SOURCE files.
Step 7: Full Reload and Testing
At this point, Analytix should be upgraded to the latest version. Now it is time to do a full reload and have the users do some testing.
The full reload is best accomplished by going into the QMC (Qlikview Management Console) and manually starting the QVD_ALL job by clicking on the play icon next to the job name.

Once reloaded have the site do a couple of days of testing. Once verified that all is well continue to step 7.
Step 8: Cleanup of Backup Directory
The last step is to remove the Backup Analytix directory. I would suggest leaving it until the site is confident that the Upgrade was successful.